Wednesday, May 6, 2015

Vivid Hue Home in local CT Feature


Farmington Small Business Spotlight: Vivid Hue Home

Our small business series shines a light on local business owners in the community.

Farmington Small Business Spotlight: Vivid Hue Home

Every local business has a story worth sharing with the community. And that’s the belief behind this exciting series — to shine the spotlight on all our favorite local businesses, and to learn a little about the ones we may not know that well. 

How did you come up with the name?
I started a popular design blog 3 years ago called,Vivid Hue Home. I believed that everyone could use a dose of color in their lives and I loved to mix patterns and colors in decorating. The blog ended up being a platform for the decorating projects in my own home located in Farmington, CT.

Why start a business in this town?
I am a Farmington resident and have wanted to bring a unique gift shop to our area. I wanted to create a destination that locals could visit frequently and always find something different and unique for their homes. One of the historical cottages became available along the row of buildings on Brick Walk Lane and I thought that would be a perfect spot for my type of gift shop. The boutique is located within walking distance from Miss Porter’s School, the Hillstead and the Stanley Whitman House.

What business are you in?
My gift shop offers stylish “must haves” for the home. Vivid Hue Home is the perfect destination for a hostess gift, greeting cards, dorm room décor, small home furnishings, pillows, art, tabletop accessories, colorful accessories and other gifts. I am also featuring a few brands of furniture that have never been offered in Connecticut. While I will provide staple items that you can always find, I want to always have rotating inventory so that when my customers come into the shop, they will always find something unique and different that they won’t see anywhere else.

What’s the most difficult challenge you’ve faced as a business owner?
So far there have not been any, other than all of the preparation involved with opening up a small, locally owned business.

What’s been your proudest achievement since opening?
We opened on May 1 and the feedback has been tremendously positive. Local residents have stopped in to check out our space and have said it reminds them of a gift shop they’d see in Palm Beach or on Martha’s Vineyard. Many customers come into the shop and make themselves comfortable on the sofa and vintage chairs and sit and socialize. I love the idea that we’re not only a gift shop but a local destination for the community.

How does your business give back to the community?
I hope to participate in local charities and offer a fun, unique destination for my customers.


Friday, March 27, 2015

Local Press for VHH Retail

Vivid Hue Home was featured in this week's local Farmington, Connecticut publication, The Farmington Valley Press.  Click here for a link to the full article! 


The countdown is on!

Cheers,
Heather


Wednesday, March 25, 2015

Prep for Retail Shop: Temporary Wall Covering Solutions

I've been focusing on getting the store ready for the opening which is why I haven't posted much here.  The last photos I shared with you were those of the raw space before I took over the lease in December.  One of the challenges from the start was how to give my shop an updated, more modern look without permanently altering the structure on the inside.


The landlord/owner was very clear that he wanted the interior walls to remain unaltered.  He was open to the notion of me using removable wallpaper during my lease term, but when I moved out, I needed to leave them with the wood as seen in this photo.  This building is historical and resides in the Historic District in Farmington.

Here were my attempts at non-permanent wall decor:

1. Inexpensive Removable Wallpaper

Many may recognize this pattern from Target's line of removable paper.  At $30 per roll, it makes
experimenting very budget-friendly.  Right from the start, I noticed a problem.  The grooves in the paneled wall showed right through the paper.  And to boot, when I stripped this off the wall, the varnish came right off of the wood finish.  Bust.  (See where I've used removable wallpaper at home and it's worked brilliantly.  Another view here).


2. High End Removable Wallcovering

I splurged on higher end removable wallpaper.  This is Hygge and West Raindrops Blue/Gray.    The better quality paper was enough to cover the grooves in the wood paneling; however, when I striped this little tile from the wall, it still stripped the gloss finish from the walls.  Also, this single tile is a hefty $30 so if I'd decided to cover the entire wall, it would have cost me thousands of dollars.  
On to brainstorming about another option.  


3.  Gift Wrap as "Faux Paper"

Out of desperation to hide the panel wall, I purchased numerous rolls of colorful gift wrap and attempted to thumb tack it to the wall.  At one point, I think I'd half convinced myself that it wouldn't be half bad.  (Ignore the seams).  But, after about two hours of looking at this nauseating polka dot pattern, I came to my senses.  I had dreamed too long about opening up this shop to skimp corners in its appearance.


4. 1/4" Luan Wood Frame


I was starting to get to the end of my rope in creativity.  I am sure I could have found a way to use fabric to drape along the walls to cover the out-dated wood.  However, one day, I was talking to a friend of mine (who is also a very talented Kitchen & Custom Cabinetry craftsman).  He suggested framing out the entire perimeter of the shop with a thin luan wood panel on top of the existing wall.   From there, I would be able to install professional (permanent) wall paper and paint.  The idea would be that when I move out from the shop, I will be able to remove the faux luan walls that have been place in front of the wood paneled walls and the original walls will be there, untouched and in their original state.  

Bingo.  

First step was to remove all of the molding around the ceiling, window and door trims.  Next, they adhered the wood to the walls at the very top and very bottom with finishing nails.


And finally, the wood molding went back up around the ceiling, floor, windows and door frames.  Here are photos of the project after the luan wall was installed.  Still lots of work to be done, but now I had a clean palate to work with.

Note:  This was a rather costly solution.  It would have been much less expensive to slap a few gallons of paint over the wood paneled walls, but because that wasn't an option, I pursued this one.  It was a few thousand dollars, which is not a solution I would recommend for a home project.  But given my constraints and lease requirements to preserve the existing walls, it was well worth the budget because it then allowed me to paper and paint as I wanted.


5. Professional Wallpaper and Paint 

If you've followed me for awhile, you already know that I'm a huge fan of Meg Braff Designs. 
See mudroom here.   I wanted the future shop to have a West Palm Beach/ Hollywood Chic feeling to it and I found this vintage trellis paper from Meg Braff and fell in love!  


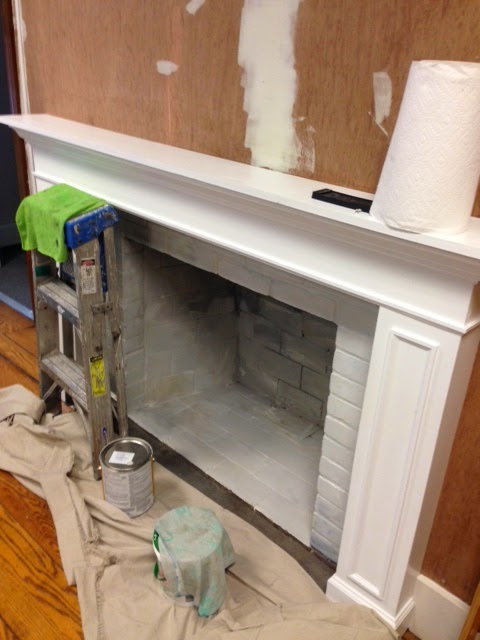
And so, the install began!  The seams between the luan wood were sealed.  I decided to paint the old fireplace (full of soot) with a refreshing Benjamin Moore Dove White over the black.


And slowly, the future shop started to come together.  You'll notice in this photo that I also replaced the drop ceiling tiles with updated vinyl tiles.  Still no paint.  Still no changes that couldn't be undone.  And of course, my eye was immediately drawn to the molding around the ceiling of the room (still wood) and the wood around the doorways.


Initially, I had two walls in the shop covered in wallpaper and the other two walls painted in a turquoise.  But with the dark wood still around the windows (and the vision of future colorful accessories), I decided to have the painter go over the turquoise with Benjamin Moore Dove White.  Yes, even I sometimes opt for less color when it makes sense.


This is the progress of the shop around mid-January.  At this point, my mind was still racing about many things, including:


  • How would I "mask" the remaining dark wood trim in the shop without painting?
  • What window treatments would work?
  • What would I do for product shelving?
  • What about accessories (lights, rugs, mirrors)?
  • Without being able to update the floor, how would I modify the floor covering? 
Check back to see further progress on the shop (and if you can't wait and want a few sneak peeks, hop on over to Instagram to see up to date photos).  

Thanks for your continued support and for following along this journey!

Cheers,
Heather