Thursday, November 19, 2015

How to "Build" Garland


Recently I posted a photo on Instagram displaying my stairway garland.  A few of ya'll wanted to know how to recreate it and I gave a brief description about how I use multiple layers to "build" it.

Today, I'm going to provide more details into my garland process.

The finishing result produces thick glorious garland full of pine cones, berries, lights, leaves and greenery.


The fact that I already have my garland hanging and it's only mid-November should be a tell tell sign that I don't use fresh greenery on the stairs.  My rationale is that it's such a heavily trafficked area so artificial greenery can withstand the traffic and hold up over time.  Plus, I'm able to get a jump start on my seasonal decorations and I know they will last the entire holiday season.

Supplies Needed: 

Here are the ingredients that I use when "building" my garland.  I say BUILD because it truly is a layering and adding process.  (But very simple).  

1. Higher Grade Garland
2. Layering "Roped" Garland with Berries
3. Sprigs and Fillers
4. Lights
5. Garland Ties
6. Extension Cords

1. Select a higher quality garland from your local craft store.  

It should include real pinecones, life-like berries and a few extras such as twigs.  Anything that further enhances the "real" appearance.  It usually retails for $40-100 (but it is ALWAYS 50% off, so you should expect to pay $18-30 per strand.   I used Michael's Celebrate It Winter Naturals $18.


2.  Select a decorative strand of "wrapping" garland.  


By this, I mean the ropes that contain holly and berries.  Or just berries that are strung together.   These ropes are usually located in a separate section away from the greenery.
I found ropes of small berries from Michael's (not pictured here but very similar to the holly with faux berries as seen in this photo).  Again, it is ALWAYS 50% off and will likely run around $7 per rope.


3.  Select fillers and sprigs

This aisle in any craft store is usually the most daunting.  In it's entirety, it's easy to dismiss this aisle as a bunch of tacky and elaborate bins filled with gawdy decorations.  Take time to hone in on each individual bin and picture each sprig on it's own.

Look for life like berries that can be added into your garland.  I always go for the berries that do not have any dazzle, meaning no sparkle or glitter falling off of them.   I try to pick things that look like they could be found in nature.


5. Select Lights

I use white lights.  Make sure they can connect multiple strands together.  The craft stores usually have them discounted and a package of 100 will usually cost around $6.  I always purchase more than I think I will use...and I always need more than I have purchased! 


6.  Garland 

Garland Ties are my LIFESAVER!  They make the job so much easier and are a must.  I use the plastic ties from Lowes (Holiday Living 10-pack Plastic Garland Ties $3.99).  


7. Extension Cords

I usually use one cord at the bottom of the stairs and one at the top for obvious reasons, to plug in the lights! 

Process for Building Garland: 

I wish I had photos of the actual layering process but I didn't capture those.  Still, once you have all of the ingredients, building the garland becomes simple.  

1.  Start with the "higher quality" garland and use the garland ties to affix to the railing.  A few tips: I usually start at the top of the stairs and work down.  I do NOT waste time wrapping the garland in between all of the individual posts.  I line the garland on the top part of the banister and tie the garland ties every 3-4 feet to hold it in place.  (This is the only time I use the garland ties).  

2.  Drape the roped berries on top of the greenery.  Tips: Start at the top of the stairs and work down.   Do not simply lie directly on top.  Attempt to make it appear natural with a "s" shape formation over the greenery garland.  

3. Add Lights.  Determine where the most logical location will be to plug in your lights.  For example, i have an outlet at the bottom of the stairs that is hidden behind a dresser.  My outlet at the top of the stairs is around a corner in the hallway.  Because of this, I wanted my "plug in" location to be at the bottom of the stairs where it will be hidden.  Determine your "start" location accordingly.  (For example, I begin at the top of the stairs so the plug will end up at the bottom).  

 I used to meticulously wrap the lights around the banister between each stair post.  Now, I drape the lights over the top of the greenery in an "S" shape and use the wire from the greenery to "hold" the lights in place.  (Wrap a few of the twigs over the light cord to secure in place).  


4. Add Fillers.  Take the sprigs of berries and pine cones and plug into parts of the garland that appear bare.  You may find that you don't need many fillers by this point.  

5. Ribbon.  I do not add ribbon to my stair banisters but it certainly adds another dimension.  


I find that the end result of this process brings a beautiful and custom appearance.  Of course, the same can be done with fresh greenery!   

Now, I have to resist the temptation to turn on the lights until after Thanksgiving.  It's nice to get a jump start on the decorating, but I have to pretend that we're still singing pumpkins and gourds at our house until December!  

To check out some of Vivid Hue Home's previous Christmas decor, look here:


Check out my live decorating updates on Instagram


Friday, November 13, 2015

Vivid Hue appears on Better Connecticut!


Today we were thrilled to be featured on Better Connecticut with Scott Haney and Kara Sundlun.  Reporter Melissa Cole came for a visit to the shop and we discussed how to create a holiday mantle that will last through the autumn season. 

Impress Your Guests on Thansgiving with these décor tips
To view the segment, click here. 

Next Month, I will be on Better Connecticut again discussing how to make a terrific New England (live) centerpiece!

Vivid Hue Home is open
Tuesday through Friday 930am-5pm 
Saturday and Sunday 10-4pm
We are located at 775 Farmington Ave, Farmington CT  06032


Check out how Vivid Hue Home builds garland for the stairs at Christmas here.


Wednesday, September 30, 2015

Let's Cut The Ribbon

I tend to stretch my celebrations out as much as possible, so of course, celebrating the opening of the Vivid Hue Home shop is no different.

On Thursday, October 1st at 4pm, the Farmington Chamber of Commerce will help us celebrate our business opening with a ribbon cutting ceremony.


I'd like to invite all local readers to attend!  The event will be held rain or shine.
The actual ribbon cutting will occur at 4pm.

Between 3:30pm and 4:30pm we will offer a 20% discount on orders (regularly priced merchandise) if you mention the word "RIBBON."

The shop will be open until 6pm so even if you can't make the actual ribbon cutting, please join us for a celebratory glass of wine and shopping.

Wine and light appetizers will be served and you can see all of our new fall inventory!

Additional details about the shop here.


Wednesday, September 23, 2015

Vivid Hue Home Sale


We are having our first sale at the shop.  Having never done this before, I was surprised by the logistics that need to be worked through in preparation for the actual sale.  We reduced summer items, props previously used in the shop, pillows, candles, accessories and even most of our custom furniture.

The sale launched on a Thursday and yet I struggled with coordinating the logistics leading up to the sale.  For starters, I wanted the sale merchandise grouped together in the store for easy browsing and shopping.  But, I didn't want customers to necessarily know the merchandise was "sale" before the actual start date.

I started by grouping all items targeted for the sale onto the white shelves (not marked down yet).


The inventory needed to be reduced in the computer system, but not too far in advance before the sale.  The actual sale inventory needed to be labeled with its reduced price but coordinated close enough to the sale launch.  I stayed awake at night playing through the scenarios....what if we labeled the sale price on the merchandise and a customer went up to purchase it and the original price rang up?    (Ha, in retrospect, this seems like small things to keep me up at night, but I am obsessed with being as buttoned up as possible).


I decided to create an inventory spreadsheet and determine my mark down prices there first.  I didn't do an across the board "everything 40% off" because my margins on some items vary.  So, I literally went through every single item to see what I purchased it for, and what I could discount it for.  (Yes, likely a rookie move to spend that much time but I wanted to be responsible about the mark downs and make them fair and enticing for my customers).


 A day before the sale actually kicked off, the staff and I tag teamed to do the mark downs.  I would call out a set of sale items.  A team member would add a pink dot with the reduced price.  At the same time, I would manually reduce the item in our point of sale system.  We did this one by one.  Yes, I'm sure there is a more automated way to make these reductions, but this was the best way for me to make sense of it this time around.


We invited all of our customers to a VIP pre-shopping event the evening before the sale kick off.  I wanted to give our loyal shoppers an opportunity to have access to the reduced merchandise first.  We served wine (any opportunity for wine!) and apps and socialized while guests shopped.

The sale has been a great opportunity to clear space in the shop in preparation for the fall merchandise.  At the ending of the first week of the sale, enough inventory had cleared that we decided to totally change up the entire look of the store.  We flip flopped the soft from one side to another.


We created a seating vignette with the Palm Beach Vintage chairs and our awesome Nova Chandelier.


Styling means everything.  For the longest time, we had the chandelier sitting at the floor level and it was hard to appreciate it's lines.  Once we hung it from the ceiling front and center, it sold within a week.  


We've also decided to bring a little extra glam to our back room.  We previously coined this as the "lake house" room because of it's rustic displays.  Now, it's black and chic and glamorous for the fall.


Now we're ready to move into the autumn season.  We'll continue to put out new inventory as we grow closer to the holiday season!

Front door wreath at Vivid Hue Home
We still have a handful of items that are reduced in the shop.  If you're local, stop by!  We're located at 775 Farmington Ave, Farmington CT  06032.  Shop hours Tues-Friday 10-6pm . Saturday 11-4pm

Thank you for following along!  And if you want day by day updates on what we're up to, follow us on Instagram!

Cheers!


Friday, August 28, 2015

Thank You Channel Two

I am thrilled to announce that this week Vivid Hue Home is featured on Two's Company's blog as the Customer Spotlight!

Courtesy of Two's Company
Two's Company designs and distributes decorative wholesale accessories and giftware exclusively for retailers.  If you haven't heard of Two's Company specifically, it's likely that you have encountered one of their stylish products in a store without even realizing it.

They recently updated their blog, called "Channel Two" with a facelift.


And then, what do you know!?  Vivid Hue Home appears right there on the homepage as the Customer Spotlight!    I'm thrilled and honored to be featured!  


We love Two's Company at Vivid Hue Home!
Thank you for the spotlight.

Cheers,
Heather


Wednesday, August 26, 2015

Epic Estate Sale in CT this Thursday!

Connecticut readers, get ready for the most epic estate sale.

Remember my post about the fanciest tag sale in Connecticut?   Well get ready because Greenhill House is at it again.  This time, with an estate sale.  Krystian is  relocating to Palm Beach and, while I'm selfishly sad to see him go, he is leaving plenty of fabulous finds behind for all of us!

This sale is THURSDAY August 27th, 2015 starting at 8am.  And plan to get there early because there are sure to be crowds.


Greenhill House Estate Sale
1210 Prospect Avenue
West End Hartford, Connecticut
8am Start
Cash, Check + Credit Cards accepted

Sale runs from Thursday thru Sunday!

Krystian was kind enough to give me a sneak peak of the sale items today.  Check out below for a preview into some of the goodies you'll find.  

Krystian has hired a professional event company to orchestrate the entire event.  This is sure to be an "event" you won't want to miss.  I love this Chippendale arm chair.


And this marigold bamboo umbrella stand is to die for!


There is an entire bed of throw pillows--everything from custom to needlepoint to one of a kind to floral...You name it.  All unique in style and would seriously up the glam factor of a sofa or side chair.


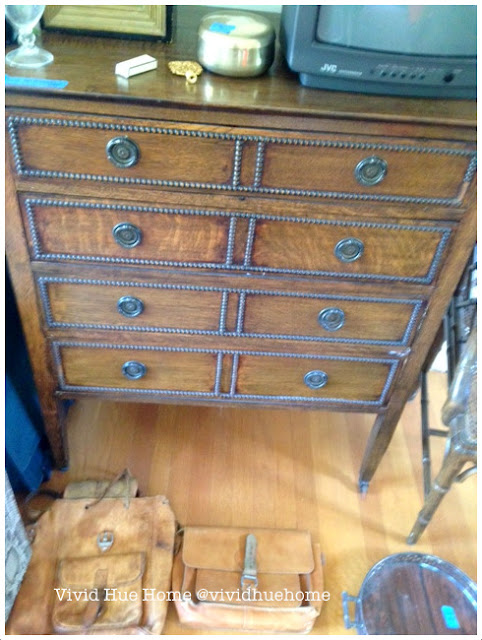
There are wonderful pieces of furniture including this studded dresser.

 I was drooling over this bamboo etagere.  Sadly, I left it behind because I don't currently have a place for it.

There are table lamps and fine art (some originally $600 and up now selling for $250).  You can spend some serious time going through the many art books and coffee table books.


The views of the estate are exquisite.  Located on Governor's Row, there are mansions after mansions all finely manicured and kept.


I have always loved Krystian's sense of style.  He dresses impeccably well and his is allowing shoppers access to an entire roomful of his tailored jackets, ties, dress shirts, dress shoes, pants.  It would be a gentleman's dream!   There are remnant fabrics and fur throws and Staffordshire Dogs.

If you live in Connecticut I highly recommend you fit this into your schedule tomorrow.  I promise, you won't be disappointed.

Krystian is now a contributor for House Beautiful magazine.  I am so envious of the fun projects he'll get to work on in the Palm Beach area!  It will be sad not to have him  close by in Connecticut anymore, but this just means a road trip to Palm Beach is in order!

Wishing KvS the best of travels during the next week.
Cheers and martinis!  Until next time.

Heather

Tuesday, August 25, 2015

Happy 21st Birthday, Dad!

 If you've been following Vivid Hue Home for awhile, you already know how it's possible that my dad is celebrating his "21st birthday" today.  If you're a new follower, let me explain...


On August 25, 1994, my dad received an organ transplant.   Prior to that date, he had been in the transplant recipient program for close to a year and a half.  Once he showed signs of advanced organ failure, he was moved to a critical wait list.  He received a pager (a sign of the times in 1994) and carried it with him day and night in hopes that he would be contacted about a donor.  Within a week of being put on this list, he received the call.

The donor was a sixteen year old teenager who died in a car accident.  Though we have never known the donor or his/her family, their unselfish decision to donate has allowed my family to experience over two additional decades with my dad.  Twenty one years and counting.  My dad was literally given a second chance at life.

So, happy 21st birthday, Dad!


One aspect of organ transplantation I don't know if many understand, is that organ rejection is a constant threat.  There is constant risk for the immune system attacking the transplanted organ.  The recipient must take daily immunosuppressant medications to help prevent rejection, but often there are severe side effects and health conditions that result from taking these drugs.  It's common for doctors to make frequent adjustments to the combination of drugs.  And sometimes, other organs can become at risk due to the prolonged use of these medications.  It's a courageous journey, but one I'll bet most transplant recipients would say is worth it for the reward of life.

The benefits of organ donation are endless.  Not just for my family but for thousands of others.


In 2014, organ donors made close to 30,000 transplants available.

Every 10 minutes, someone is added to the national organ transplant wait list.

On average, 22 people die each day waiting for a transplant.

One donor, can save 8 lives. 
(Above statistics provided by HRSA).

It's easy to become a donor:

  • Designate your decision on your driver's license
  • Tell your family about your donation decision
  • Tell your physician, faith leader, and friends
  • Include donation in your advance directives, will, and living will       
Source: organdonor.gov

You can also register on the Department of Health and Humans Services website here.

Thank you for allowing me to share this with you.  I don't like to use this blog for public service announcements, but this topic is very close to my family.

Wishing my dad a very special day.

Cheers,
Heather