Thursday, November 7, 2013

ORC: Week 6 Final Reveal- Guest Bedroom

Thank you for joining me for the final reveal of the One Room Challenge!  If you're just joining, you can catch up with my guest bedroom transformation here:

Week 1   |  Week 2    |  Week 3     |  Week 4   |  Week 5  |  Week 5 1/2Week 5 3/4

The past six weeks have been an adventure.  One lesson I learned for next time is that I need to tackle my sub-projects much earlier!  I was worried about revealing too much too soon.  Instead, this was a "down to the final minute" finish. 

But, I won't bore you with any more small talk.  Today, it's all about the pictures.  (Speaking of which, please excuse the night time shots!) 

Introducing, my Bohemian Chic/ Palm Beach Guest Room:


 I hadn't planned to do a gallery wall but my five year old daughter also sleeps in this guest room each night (it's closer to our master), so I wanted to add a touch of something that would have meaning and represent her.  I selected a few quotes that reminded me of her, some photos of her that I love and some artwork that she painted. 


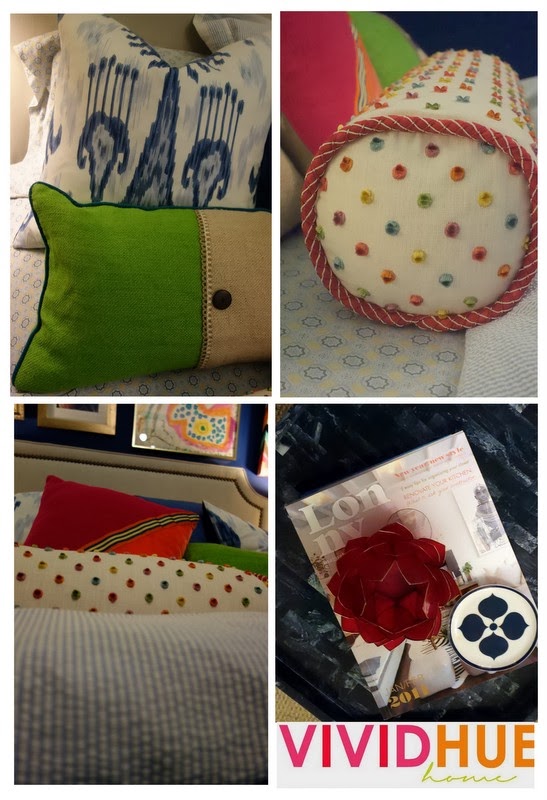
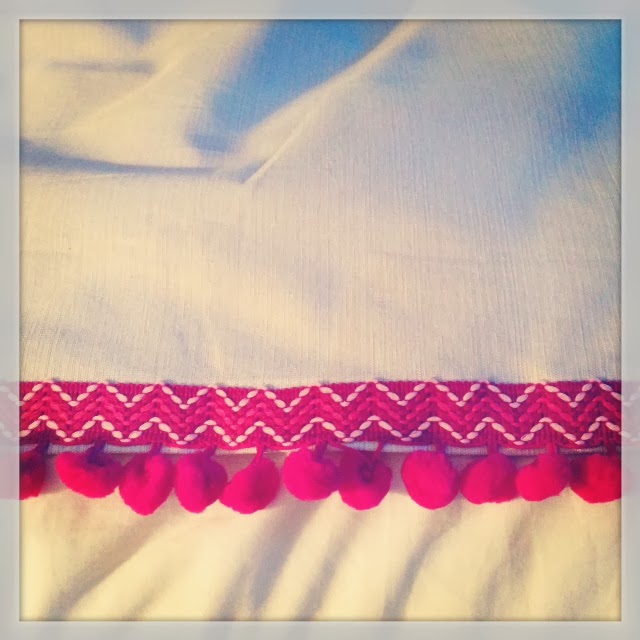
I added this pom pom fringe to the curtains when I realized that I was going to have to rethink my plan to put ribbon nail head trim around the room (because the Petersham ribbon was on back order since August). 
 
I just found this stool today at Home Goods and fell in love.  It's perfect for this room and I love it!


I'm Home Goods obsessed.  The chair is also from there and I love how it pops against the blue walls. 
  
The wallpapered ceiling was not originally in my design plan either.  It all comes back to that back ordered Petersham ribbon.  I wanted to add something else of interest so decided to try removable wallpaper.  See previous posts to learn how it ended up as stripes versus a solid color on the ceiling. 


That Stimulight Urchin Chandelier continues to be the focal point of the room. 
It's definitely a show stopper! 


Sources:
Turquoise Nightstands: Parker Kennedy Living | Nail head Headboard: Ballard Designs | Brass Lamps: Home Goods |  Vintage Sailboat Painting: Antiques on Nine in Kennebunkport |  Brass Crane: Blaze and Bloom | Bed Linens: Serena & Lily | Ikat Pillow, Navy Pillow, Green & Linen Pillow: Home Goods | Bolster Pillow: Custom from Calico | Fuchsia and Orange Velvet Pillow: Blaze and Bloom, CT | Vintage Green and Turquoise Bedspread: Antiques on Farmington | Large Chevron Painting: Jennifer Moreman, One Kings Lane | Fuchsia Chair: Home Goods | Alpaca Throw: Ascher Market/ Spaces of Kennebunkport | Chinoiserie Melamine Tray on Bed: Kim Seybert | Quote Art (both): One Kings Lane | Miss Porter's Oil Painting by Dawn Lombardi of Farmington, CT |  Drapes: Target Threshold | Pom Pom Fringe on Drapes: Ichimylove on Etsy | Rhino Stool: Home Goods | Zebra Dish: C Wonder |  Turquoise Urchin Chandelier: Stimulight on Etsy |  Pink Tulip on Navy Tray: Furbish Studio | Navy Faux Wood Inlaid Tray: Home Goods | Green & White Stripe Jewelry Box: Home Goods
 

A tremendous thank you goes to Linda from Calling It Home for allowing over 70 additional design bloggers to participate in this challenge as linking participants.  I would encourage you to head over there to check out links to all of the linking participants that are posting their final reveals today. 
 
Also, please visit these amazing 20 ORC design bloggers for their reveals here: 
 
 Thank you for stopping by!  Please continue to come back and visit even though this challenge is over!  Would love to have you back as regulars! 


Monday, November 4, 2013

ORC: Week 5 3/4 Pom Pom Panels


I'm telling ya'll...I've been completing projects in double time this week.  At the beginning of this challenge, I set out to trim my room in Petersham ribbon and nail head border.  Yet, the silly ribbon has been on back order LITERALLY since August 12th.  I cancelled the ribbon order last week and went for plan B. 

Lately I've been a huge fan of the French tassel window panels.  Serena and Lily introduced these earlier this year and they had me drooling:   


Serena and Lily


Strawberry French Tassel Panel by Serena and Lily

I'm also a huge fan of panels lined in pom pom fringe like below:  

via Amber Interior Design
 
So, when I spotted this fabulous pom pom fringe on Etsy's shop, Ichi My Love, I ordered it on the spot for my Target guest room panels.  A few concerns.  The seller was located in Taiwan.  I wanted this in time for the One Room Challenge reveal a week later.  So after a few emails with Na of Ichi My Love, my trim was in transit via expedited shipping to good ole Connecticut.  (Yes, you can make most things happen for a price...let's just say I paid more in shipping costs than I did for this trim.  But it was WORTH IT!)
 
 
I'm no seamstress.  I'm all about stitch witchery.  All of the time!  It is instant. 
Easy. Quick. With great results.  Here's proof: 
 
Via Vivid Hue Home
 
I managed to get two entire panels complete in the first fifteen minutes of the horribly cheesy George Clooney version of  'Batman and Robin'....  (Robin: [checking out the Batmobile] I want a car, chicks dig the car.   Batman: This is why Superman works alone).  Luckily, it was lights out for my son at 8:15pm and I was done with these babies just in time! 
 
 
Tomorrow I'll tackle the other window. 


The room is still getting pulled together.  I didn't even move the step stool from these iphone photos.  I promise better photos for the final reveal on Thursday (remember, I'm a linking participant so my reveal will come then). 


I do like the extra bit of detail that the trim gives the panels.  What do you think?

If you're just joining the One Room Challenge journey with Vivid Hue Home, catch up on the last 5 weeks here: 

Week 1   |  Week 2    |  Week 3     |  Week 4   |  Week 5  |  Week 5 1/2


There will be 20 bloggers that will share their reveals on Wednesday on Calling It Home so hop on over there for the beginning of the excitement! 


Sunday, November 3, 2013

ORC: Week 5 1/2 Art GalleryWall

This week, true panic set in.  I looked at my lil ol One Room Challenge Guest Room and realized that I still had a heck of a lot to accomplish before the final reveal!  If you're just joining me for this journey, where the heck have you been?  I could have used your help these past five weeks!  Just teasing. 

The ORC is a six week makeover where design bloggers select one room to transform in this short time frame.  Each week, a little bit of progress is revealed.  You can catch up on my previous weeks here: 

Week 1   |  Week 2    |  Week 3     |  Week 4   |  Week 5  |  Week 5 1/2  |  Final Reveal


And in this last 1/2 of a week, I have embarked on many sub-projects that should have been accomplished during the previous weeks.  Including, the art gallery wall!   Now, admittedly, this wall wasn't even in my original plan so how could I have known to put it on my radar?  But after seeing the room come together, a gallery wall was definitely in need! 

I found some rustic looking frames at the craft store with the intention of gold leaf spray painting them.  I liked the imperfections in the wood.   


I hauled these babies outside for some spray painting. 

 
Put a few of my favorite "Vivster" photos in there. 


As you may recall, my daughter sleeps in this guest room every night.  (Yes, odd...but it's closer to our master bedroom.  So, in theory, this is really like our five year old's room too).  So I decided to add a bit of her art in here.  This is called "Duckie" by the Vivster. 


I pulled some items from our sunroom up for the wall.   This is a painting of Miss Porter's in Farmington, Connecticut by my friend and the fabulous artist, Dawn Lombardi.  (Check her out on instagram, farmingtonpainters


How I Create an Art Gallery Wall:
1.  I arrange the art I hope to use on a large space on the floor/bed in a desired format.


2. I cut large print paper in the size of my art so that I can position the paper on the wall prior to actually hanging the pictures. 


3.  This allows me to play with the spacing and layout of the items before putting holes into the wall.  I can get a visual of how things will appear and make sure the paper is level before the very first hole is hammered.   Then, I literally hammer the nails right into the paper and hang each picture one by one (removing the paper as I hang the picture). 


4.  Voila, done!   I don't want to give away too much before the 'big reveal', but here's a sneak peek of the art wall.  To see how the entire wall turned out, please check back this Thursday for the FINAL reveal! 


I'm a linking participant to the ORC so Thursday's my day...the original 20 design bloggers will reveal on Wednesday.  Click over to Calling It Home for the exciting reveal!