Showing posts with label room makeover. Show all posts

Thursday, October 9, 2014

ORC Week 2: Bunk Bed Selection

 We're entering week two of the One Room Challenge.  Check back here for Week 1. 

You may recall that the last time I participated in the ORC as a linking participant, I made over our guest bedroom.   Here's the bohemian chic guest bedroom reveal  (another post here) from the past challenge. 
This time, I'm making over my 7 year old son's room and have been on the hunt for a bunk bed that will grow with my son.  I don't want anything that is flimsy or temporary looking.  I noticed that many of the styles I'm drawn to are built in bunk beds.  Built into the walls of their environment.  Hmmm...well shoot, I wasn't planning on THAT endeavor. 

Here are some of my favorite beds located in my search:
Courtesy via Marcus Design
Via RH Gallery

Courtesy via Houzz.com
Rover Homes

 
Coastal Living via Babble

Yep, as I told you.  Most of these are built-in bunk beds that have been custom built into the room.  I wanted something that was grown up.  Not too childish.  A bit industrial. 

So my selection: 


The Restoration Gallery Baby and Child Bunk Bed! 


Via RH Gallery

Here's why:

Each mattress is full size rather than the standard twin size for a bunk bed.  I love the distressed wood and the sturdy look of these beds.  These are shown in the white but I'm ordering them in the darker wood.  This photo is a bit feminine for a little boy's room, but I have some ideas about how to make them more masculine. 

I'm still on the hunt for a way to make the ceiling stand out in a unique way. 

I'm fighting the urge not to paint the room in bright colors like the rest of my house.  My theme is neutral tone for this room!  Fight the color pop urge. 


Next step, figuring out the walls of the room.  That may help shape the rest of the décor.  For a better look at other rooms of my house, check here

Thanks so much to Linda from Calling It Home for allowing us Linking Participants to join in on the One Room Challenge. 


Here are some of the other

 
Here are individual links to each participant. 
 
Additionally, You can see more linking participants by visiting Calling it Home
 
Cheers!
Heather
 

Wednesday, October 23, 2013

Week 4: One Room Challenge Guest Room Makeover


Welcome back to the One Room Challenge.  This is week 4 of 6 week room makeover challenge.  This design challenge is the brainchild of Linda from Calling It Home.  This semi-annual event started with 20 design oriented bloggers (selected by Linda) would participate by selecting one room of their own to transform from start to finish within the 6 week time period.  Each week, progress is shared on the blogs until the final reveal at the very end. 


This year, Linda has extended the One Room Challenge to include linking participants.  And this is where Vivid Hue Home comes into the mix.  I have decided to join the craziness and transform my guest bedroom during this time frame.  If you're just checking into Vivid Hue's progress, please go back to the start and see where we started from in the previous weeks here:


Week 1   The Plan 
 
Week 2   Progress         
 
Week 3   Evaluate
 
 
Now that you're caught up, I must admit that I felt a tad bit guilty leaving ya'll with so many teasers last week.  I was in a baaad place last week.  I hadn't made much progress.  My gorgeous Urchin Chandy was still sitting in the box.  I wasn't looking forward to pulling the power drill back out to try to hang the drapes.  I was in a funk. 
 
 
Well...I managed to find a little extra kick in my step this week (aka, light a fire under my arse) and get some stuff completed.   And I'm going to reveal a few things this week:
 
Most exciting news, this baby - the Turquoise Urchin Chandelier by Stimulight - is no longer in the box.  And let me tell you, it is as great as I'd hoped it would be.  Here's a sneak peek of it in the ceiling. 


Last week I gave you a pitiful lil teaser for the fabulous brass lamps that I found.  It looked like this: 
I chuckle now.  I promise I will never do that sh*t to you again.  We're better friends than that.  You deserve more.   
 
 
Here's how both of the lamps look!  I wanted something simple that would not compete with the sputnik chandelier.   I had to go to two different Home Goods locations to for these.  I spotted only one at my usual Home Goods but I snatched it up determined to locate a second.  I paid $59.99 for lamp #1.  The very next day, I headed to the second local Home Goods and found the exact same lamp but it selling for $99.99.  FORTY DOLLARS DIFFERENCE.  I explained to the store manager at the Wethersfield, Connecticut store that I'd just purchased the exact same lamp with a different shade yesterday.  He was super accommodating and trusting and he agreed to do a price adjustment for me in good faith that I was being honest (and I was). I wanted to mention their stellar customer service here.   (I did have my receipt but oddly the lamps had 2 different ID numbers which muddied the waters).  
 
I have also been able to get beveled mirror tops made for the Parker Kennedy nightstands.  I am obsessed with the nightstands but the boys warned me when I purchased them that they had some water damage on top.  I took measurements of the tops.  Found a local glass and mirror company.  Called the order in over the phone.  I requested a 1 inch thick bevel.  Two weeks later, I went to pick the mirror tops up and they fit like a glove.  I still need to change out the nightstand hardware and touch up a few spots that are damaged on the paint.  And of course STYLE the nightstands.  But the mirrors up the glam factor!  ($80/ each nightstand)

 
I hung the brass hardware and linen drapes in the room.   I did give the power drill another go.  It worked out much better for me this time around.  I'm embarrassed to admit that I figured out why I had so many challenges when I was hanging the blinds.  (I was using the darned SCREW in the drill and not a DRILL BIT).  Lemme tell you, a hole is made in the wall much more quickly with the dang drill bit.  (Geesh, I'm swearing a lot this post and boy does it feel good)
 
 
I need to take care of the details...Like ironing the drapes.  Right now I just stuck them up there to get an idea for height and feeling in the room.  I'm also trying to determine the artwork that I'll use in the room.  I had this piece of art hanging in the guest room before and it does still have navy and wood tones that would match some of the other components in the room....still deciding. 
 
 
And lastly, remember that large splotch of turquoise blob that I shared with you last week?
 
Well, get ready for a mini reveal...
 
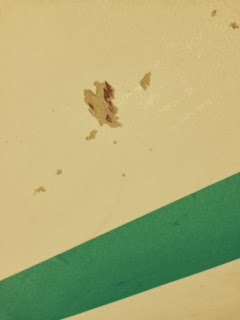
It's Turquoise Tem-paper Wallpaper and I found it on Amazon on clearance.  Because my fuchsia grosgrain ribbon is going on 3 months of back order, I had a hair brained idea of trying to wallpaper my ceiling turquoise instead.  Great in theory.  I wish I'd planned this out a bit better.  I would have purchased a bit better quality (non-clearance) paper.  Or lined up my painter to paint the ceiling a turquoise lacquer.  Here's why.  I started to lay strips of the wide paper across the ceiling and it's so thin that every single seam showed through.  It was the biggest botch job.  When I decided to peel the paper off the ceiling, it pulled my CEILING off with it.  Proof below:
 
 
WHAT A COMPLETE MESS!
 
So I decided to get creative.  I had to think of something to hide the new mess!
I am now attempting to make the temporary paper thinner.  I have cut them into strips and I'm putting them in rows of three then one then three then one across the ceiling. 


At first I worried about how it would compete with the chandelier.  But as time goes on, I sort of like it!  Here's a snippet: 


I'm thinking this may be a fun little addition to the room that came out of my little mistake.  Of course, now I'll nix the ribbon nail head trim in here because it will be entirely too much going on.  I can always do that in the mudroom.  * I had originally thought of doing it in there in the first place and now I think I'll go back to rethinking it for there. 


I have also thought about creating an art wall on one of the walls in the room.  That wasn't in the original plans.  And I need to add more oomph to those drapes.  I'm looking for fun ways to style the nightstands and I still need to add the hardware. 

The devil is in the details and I'm going to be out of town this weekend at a wedding.  I'm worried that the time is going to slip away from me!  I don't want to loose momentum now! 

What are your thoughts about what I've shown you on the ceiling?  I'm trying not to give too much away but are you cringing?  Are you intrigued?  Can you see it working?  Is it too over the top?
Be honest!

Please check back next week.  And in the meantime, check out the other participants from the One Room Challenge. 

And, as I always say, I also love to have new followers, so if you'd like to follow me on my journey, you can follow me by Google Friend Connect or by email delivery, just look over on the left hand side, and/or follow me on any of the other social media outlets as well. I like to meet new friends and will follow you back!


Vivid Hue Home's One Room Challenge Weekly Progress Posts:
Week 1   |  Week 2    |  Week 3     |  Week 4   |  Week 5  |  Week 5 1/2  | Final Reveal


Wednesday, October 16, 2013

One Room Challenge: Week 3 Evaluate...

Welcome back to the One Room Challenge!  This is Week 3 of a 6 week room makeover challenge.  If you are new here, thank you so much for visiting.  You can catch up by visiting here


Week 3.  This is the week I like to call "Evaluate...and Procrastinate"

I'm making over my guest bedroom in a sort of Bohemian Chic meets Palm Beach. 
I thought I had so many wonderful ideas at the start of this.  I'm still enthusiastic, but a bit discouraged that I'm starting to veer off course. 

Here's an assessment of where things stand: 

Remember my fabulous Turquoise Urchin Chandelier? 


 Here's an update:   Yep.  Still in the box.  I'm waiting for my electrician's schedule to free up so he can get to the house to install it!  He KNOWS this is One Room Challenge time!  He *promised* he could do the install within this time frame.  And I'm just crossing my fingers that this baby gets hung in the next 3 weeks.  This will be the *statement* for the room.  Don't make me get my hammer and screws out and nail this sucker to the ceiling!   (Reference from Week 2).


I had a surprise up my sleeve that involved this slab of turquoise: (no, I'm not telling what it is, but this is an *actual photo crop* of the secret item).  Let's just say, I think this surprise twist is going to turn out to be a complete FLOP.  I'm going to have to rethink this.  Bummer!

 
I was able to find a few table lamps for the nightstands.  I tried to find as simple as possible because that sputnik lamp doesn't need any other competition in the room!  I originally posted a photo of the entire lamp but I decided I'm going to make ya'll wait at least another week to see them. 
 (I know the suspense is killing you) 


 I haven't even attempted to hang my window hardware or drapes.  (Though they HAVE been purchased!!!)    I've been procrastinating in hanging them.  The blinds did me in.  Plus I'm charging my drill extra long this time. 

Still no ribbon for the ribbon trim.  Thank you Ms. Lisa Mende for giving me some options of where to purchase Petersham ribbon elsewhere! 
 

And now, in true procrastinating fashion, I thought I'd share with you some pillows I purchased for my sunroom today while I was supposed to be shopping for items for the guest room!   In true Vivid Hue fashion, I spotted the pillows.  Fell in love with them.  And then tried to figure out which room in the house they would fit in.  I decided I could switch some pillows out in the sun room for a bit.   Here's what I ended up with:


Pssst, there's the bamboo magazine holder that I got at *the fanciest tag sale in Connecticut*

 
I guarantee I will have more work done next week for the next reveal!  I'd BETTER!  Time is ticking away.  Please check back next week.  And in the meantime, check out the other participants from the One Room Challenge.  In addition to the below, there are over 70 that are participating in the linking challenge (like me).  You can access those from Linda's Calling It Home


Vivid Hue Home's One Room Challenge Weekly Progress Posts:

Week 1   |  Week 2    |  Week 3     |  Week 4   |  Week 5  |  Week 5 1/2


I also love to have new followers, so if you'd like to follow me on my journey, you can follow me by by Google Friend Connect or by email delivery, just look over on the left hand side, and/or follow me on any of the other social media outlets as well. I like to meet new friends and will follow you back!

Wednesday, October 9, 2013

Week 2: One Room Challenge Progress

Welcome to Week 2 of the One Room Challenge.  I'm Vivid Hue Home and I'm re-doing my guest bedroom in a Bohemian Chic meets Palm Beach Glam.  If you missed my week one, check it out here: 

Week 1 Vivid Hue Home Plan

Let me remind ya'll of my vision:


This week was dependent upon a lot of deliveries, returns, reorders and 'gettins-it-right.'
The most exciting part of the week, the Turquoise Urchin Chandelier arrived!  I must say Zach Dutton, the owner of Stimulight was excellent in fast tracking this custom chandelier to me.  I ordered it on etsy on September 16th and on October 3rd, it  shipped!

It is just as fabulous as I thought it would be!


I can't wait to get this baby out of the box and hung on the ceiling!  Right now, I'm just coordinating with the electrician's schedule to get it  hung!  It can't happen soon enough! 


For those of ya'll that have been following me for awhile, you know that I absolutely LOVE to decorate and come up with DIY projects...but I generally take a half a$$ed approach in some of the details.  (For example, why sand a door if I can just do an extra coat of paint?).  Well in this case, I purchased window blinds without having the exact measurements on hand.  I thought for *sure* that I recalled them properly.  I ended up buying 36" width for 34" width windows.  Hey...a few trips back and forth.  And back and forth.  And back again to have another 1/2" inch shaved.  FINALLY they fit the gosh darned windows.  And then my drill wasn't quite charged so I attempted to hang them by hand with a screw driver and managed to strip the screw in the process.  So, I just hammered the screw into the wall the rest of the way.  Hey, the bracket is nice and secure, and this isn't for a client (thank goodness), so I'm allllllllll set!  Here's a sneak peak of part one of the multi-faceted window treatments.  Remember, I hope to add drapes and hardware and all of that good stuff too! 


The room is painted in the Sherwin Williams HGTV SW Loyal Blue and it's looking good against the headboard!  Sneak Peak...


The fabulous turquoise nightstands are a tad damaged on the ends.  The paint is chipped and the tops are water damaged.  I need to add beveled mirrors and some paint to repair. 


And new hardware is in order.  Here is what's there currently....


 Still hunting for nightstand lighting.  I want something VERY understated as the Urchin Pendant Lamp (above) will be the statement of the room! 

One other nerve-wracking update...my Petersham Ribbon in Azalea is still processing.  I ordered it back on August 12th.  Yes, nearly TWO MONTHS AGO!  It's been on backorder since then and I'm still not sure that it will ship in time for me to do the nailhead ribbon trim border in the room.  Fingers crossed! 

 
 What do you think of the progress?  Isn't that chandelier to die for? 

If you're new to my blog, please consider following me!  I love new followers and I follow back.  Just look over to the left hand side for all of my links!  Thank you so much for continuing to follow my makeover during this journey! 

And don't forget to check out the other fantastic bloggers that are participating in this challenge.  Here are the bloggers in the #ORC and there are over 70 more participating as a linking participant in the challenge (like me)!  WOW!  Thanks to Linda at Calling It Home for starting this all! 
ORCBanner Fall 13
and you can visit their rooms here:
 

Vivid Hue Home's One Room Challenge Weekly Progress Posts:
Week 1   |  Week 2    |  Week 3     |  Week 4   |  Week 5  |  Week 5 1/2  | Final Reveal


Thursday, October 3, 2013

One Room Challenge: Week 1 The Plan + Challenge Overview

I'm thrilled to be participating in this year's One Room Challenge as a linking participant!  During this challenge, I'm going to be transforming my guest bedroom.  Those of you that follow Vivid Hue Home may already have seen some minor updates in this room.   But let's just assume we're starting from scratch for the challenge sake. 

If you are here to catch up on all of the week's progress, thank you for visiting!  Here's what's been done so far: 

Week 1   The Plan  read the post below  |  Week 2   Progress  |  Week 3   Evaluate  |  Week 4   Square Up   |  Week 5  The Chandy  |  Week 5 1/2 Art Gallery Wall


Week 1 The Plan

Here are the dreadful bare bones before photos of the Guest Room.  Now granted, ya'll, when I snapped these photos originally, I had already started tossing items out of the room because I was getting ready to start painting the walls.  I decided to snap a few "before" photos to freeze this nastiness in time because I knew there was no going back...THANK GOODNESS. 

I have big ambitions for this bedroom.  Though I call it the guest room, my daughter Vivi sleeps in this room so I have a tough client to impress.  I must confess I've already painted this room and I hope to further transform this room during the ORC. 

Here are some inspiration photos that drove my design for this room.  I wanted a dark navy wall against the canvas headboard. 

La Dolce Vita
I absolutely LOVE the color HGTV's Emily Henderson painted her office (Sherwin William's SW6510 Loyal Blue) and I absolutely adore her master bedroom with it's bohemian chic vibe.  I wanted to do something similar using fuschia, navy, turquoise. 

Photo Courtesy of Emily Henderson


Photo Courtesy of Emily Henderson
And so, with my canvas...I attempt to figure out how to achieve similar hopes and dreams within the next 6 weeks.  Here's what I hope to accomplish:


1. Paint the Room in Sherwin Williams' SW6510 Loyal Blue (see process here). 
2. Add window treatment to windows (to include bamboo shades, drapes, brass hardware)
3. Use Parker Kennedy Palm Beach Nightstands (see below). 
    3a. Add bevel mirrors to nightstand tops
    3b. Change hardware
4.  Find uniform lighting for nightstands
5. Spruce up bedding with throw pillows and color pops
6.  Consider Turquoise Beaded Urchin Chandelier by Stimulight (photo below + link here)
7.  Hang Art in Room that goes with Theme/ Vibe of Room
8. Add Ribbon Nailhead Trim border around room


Turquoise Beaded Urchin Chandelier Lighting by Stimulight on Etsy, $529.00
Custom Urchin Chandelier by Stimulight
Phew, makes me exhausted just thinking about it.  But I'm up for the challenge!  Please continue to check back here each week!

Check out what's happening with the other One Room Challenger's over at Calling It Home.  Here are the other fabulous bloggers that are participating in the challenge:
ORCBanner Fall 13
and you can visit their rooms here:

I also love to have new followers, so if you'd like to follow me on my journey, you can follow me by by Google Friend Connect or by email delivery, just look over on the left hand side, and/or follow me on any of the other social media outlets as well. I like to meet new friends and will follow you back!