I was thrilled to be included in the ivillage round up for "How to Get High Style on a Budget." Who doesn't like to achieve a top notch appearance on a dime? I've found that it pays to shop around. Oftentimes, you can find the exact same piece of furniture at a different store for less. And now, with retailers like Home Goods, decorators are able to achieve a high end look for less.
Some of my blogging buddies were also featured in this round up, including Lindsay Dress of Sadie + Stella . Lindsay has the most killer dining room and has achieved this look using removable wallpaper! (And would you ever guess those lamps are from Targay). Lindsay has been gracious enough to feature me on her Featured Room Series before. She's got ultimate style and so great to be included with her on ivillage.
Lisa Mende of Lisa Mende Design demonstrates how she uses natural elements in her spaces to create interesting and cost-effective displays. Lisa has been busy jet setting all over the country! She recently returned from the ALT Summit in Salt Lake City and is now on her way to Design Camp in Atlanta. She's a woman to watch as she was also a High Point Market's Style Spotter for October 2012.
These other ladies don't know me as much as I know them (yes I'm a voyeur into their blogs-ha). But I love them as was honored to be featured with them!
Traci Zeller of Traci Zeller Designs shared her fabulous children's room with us. She reiterated that it's important to know when to splurge and know when to save. The fabulous drapes and bedding are the splurge, the artwork and chair are the save. It all blends wonderfully!
Emily Clark of Emily A. Clark blog talks about adding texture with inexpensive bamboo blinds. You can have a very expensively decorated room and add additional layers to a room with blinds that don't cost an arm and a leg (these are from JC Penny!). Emily always has great DIY tips. Recall here when I painted my interior kitchen cabinets to mirror Emily's (sort of).
Naomi from Design Manifest blog suggests trying an accent wall. Here she's added Ikea dressers (Rast) and inexpensive accessory items to add contrast against a darkly painted wall. I have always loved this wall. I initially spotted it on Pinterest and was a huge fan! LOVE THE COLOR!
Jenny Komeda of The Green Notebook scours the Chelsea Antique's Market (NYC) for artist's artwork on the cheap. She was able to find this masterpiece for $5! (I used to LOVE this market on the weekends and miss not being able to frequent it). Jenny, you lucky dog. Love that print.
louisa from For Chic Sake decided to create her own etageres from a $40 Ikea bookshelf. She added some gold paint and mirrors and some beautiful accessories and, voila! All for under $100!
Visit here for the entire round up! Thanks to ivillage for the feature! They've been so gracious to feature me the last few months. (Check out the "Pretty Christmas Tree" feature if you missed it")
xoxo Heather | Vivid Hue Home

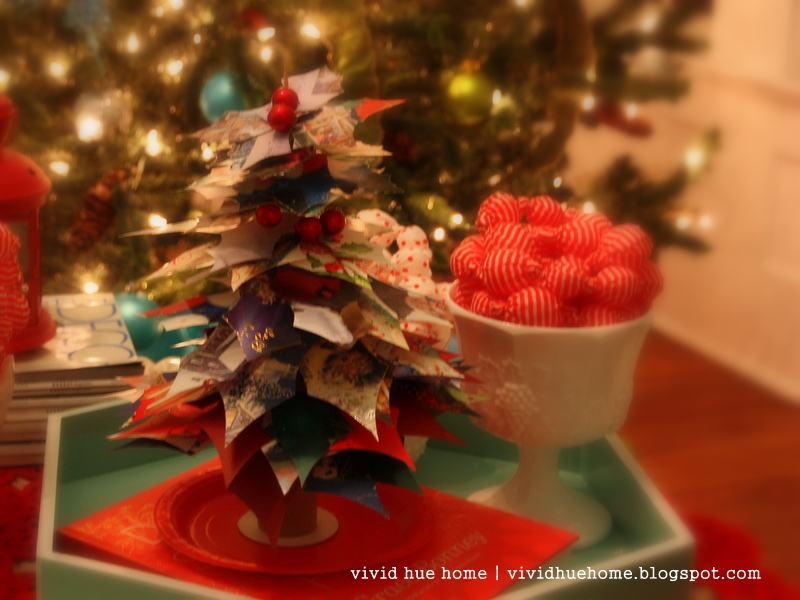
Candy garland and Christmas cards! This is what was on my mind all evening one night as I attempted to make a recycled holiday card "tree." (Full disclosure: it started out as a wreath and looked completely hideous so it was 'down-cycled' to the tree). I'm only posting this endeavor because it cost me an entire night night of my life. A night I will never get back. Ever, ever. Ever. I would like to jump up and down and encourage you all to try this at home. But don't. It's time consuming with a low yield outcome. It was tedious to cut those darned old cards into holly shaped leafs. You need an entire phone book's worth to make a good tree. The below shows the fruits of my effort after many glasses of wine. And cuts of the holly tree. And curses and retry's and rethinking on how to do this thing. This is what I ended up with. Don't judge. Ok. You can judge. But keep your thoughts to yourself!
(There it is...notice how I slyly introduced it after a few 'filler' photos.)
I found the ribbon candy that my Pipa table reminds me of!
And the side view...this is where you really see the truth. I would have needed thousands more cut outs to make this baby look spectacular and I just didn't have enough patience (or enough wine) to put the effort into it!
I recommend you check out good ole Emily Clark's paper tree on her blog. She's got the right idea!
Check out other seasonal posts on Vivid Hue here and here.
And the Vivid Hue iVillage Peacock Tree
xoxo
Heather
Other
links to Vivid Hue Christmas:
Holiday Trees
Sunroom at Christmas
Meaningful tree in Living Room
Gift Wrapping
Traditions
Christmas Antlers
Holiday Card Tree and Sunroom Photos
Christmas Table Decorations
I have been on a DIY kick lately. This Saturday, I had the morning free before the kids' soccer games kicked in. My husband was at a day conference so I knew I had a very tiny window of time to get the project underway before he got home to put the kibosh on it. (He's very tolerant of anything I want to do around the house, but my recent project of painting my mudroom interior door has turned into "50 Shades of Turquoise." Every time he walks through the door, it's literally a different color. What better way to deal with that never ending process, than to start another project!!!)
The mission...paint my interior kitchen cabinets.
We pseudo use this cabinet in our kitchen. We regularly access our wine glasses from here. And I recently scored the coffee mugs on the left from Home Goods with well intentions of really using them. But this space is not styled. And nothing pops!
My idea to paint the cabinet came from Emily Clark's blog. Not that this is a new concept. But I loved her post about turning her cabinet into open shelving. And I also loved that she painted the back of her cabinetry a dark charcoal color so the items on her shelves popped with flair! So, I decided to use the exact same color as Emily, Sherwin Williams Urbane Bronze.
While the kids were busy doing crafts projects and having a silly morning dance party in their pj's...
I took every last item out of that cupboard. Whew, by the time that was done, I was ready for a glass of wine. Only it was 9am so I thought I should probably hold off a bit.
I was a bit nervous about how the Urbane Bronze would adhere to the bead board...I'm sort of a half a$$ DIY'er. I'm not one for prepping and priming. I'm sort of a jump-right-in-there doer. So if this thing needed to be sanded down to loose some of it's finish, I was NOT the person that was going to be doing it! Instead, I dabbed on one coat. Two coats. Three coats....well, by about 2-3 dabblings, the paint started drying and then I was able to properly brush the coats of paint onto the board.
I think this is coat fifty or sixty...teasing.
One soccer game, two PB&J's, a few quick naps and one trip to Marshalls later, the paint was dry and the styling began.


I removed most of the wine glasses and stored them elsewhere. There were so many in there previously and we just didn't need them in there. We're healthy drinkers but, I mean, between my husband and myself we STILL only have four hands. I added mostly white items so there would be a real contrast between the charcoal and the white. I still tried to keep some of the functional items in here too. I'd love to start using these coffee mugs as my every day mugs so I tried to make them easily accessible. (I also used an organizer that's used for soup cans to give them some elevation). The plates on the second shelf are cookware plates that my husband likes to use for our steaks. He can heat them up to about 400 degrees in the oven (and he does) and then he plops the steaks on them and they continue to cook and sizzle. That's all great and nifty but my main concern every single time is what that little cookware plate is doing to our table underneath! We pile about 6 heat resistant place mats under each place setting to prevent damage to the tables. Ah, I guess we each have our "things." I paint cabinets charcoal black. He just about turns our tables charcoal each time we eat a steak!


And I just love when one DIY project spawns another. I've had these lanterns for about a year now. I got them from Home Goods and love them. . I usually use them for outdoor parties. I just love them. Only they've always been mismatched in color. Until now...I dabbed a lil bit o Urbane Bronze on those baby's and now they match.
I scored this chair on Joss & Main and I love the bit of red it gives.
So now, here's the moment of "true blue" as my kids say...that's where I'm sworn to be completely honest with ya'll...I just did all this work on these cabinets and I know they'd look so much better with the doors off, but I think that would be more than my husband, EG, could stomach right now. The doors are on that 'soft close' mechanism and I'm not sure I even know how to just unscrew them from the hinges. So for now, the doors will stay on there...but oh, you just wait until the next weekend day conference when the hubby's away (those suckers are goin down!)
Thanks so much for following.
And don't forget, the give-away is still going on until October 5th! Please spread the word!
xoxo
Heather